Intelligent Appliance Classification
Suppose you’d like to build a tool that automatically recognises an appliance the moment you turn it on and then trigger one or more rules, depending on the appliance it recognised. If this interests you, please keep reading. In this tutorial, we’ll show you how to build a scalable, IoT appliance detection tool from scratch, leveraging the EVRYTHNG Platform and machine learning to manage the entire experience. In particular it will allow you to detect what type of machine is currently being monitored using a self-trained classifier.
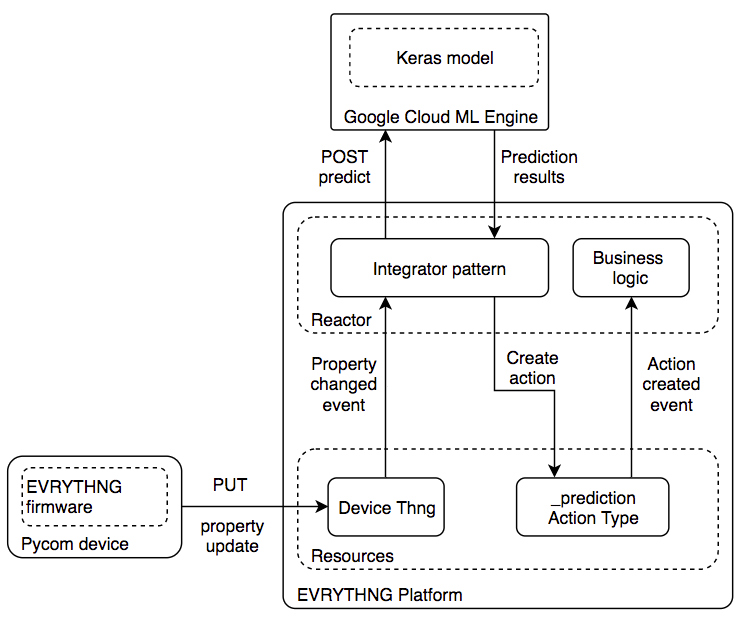
We'll take you through all the steps, from setting up a Pycom device for appliance monitoring, obtaining training data, to training and deploying a Keras model in the Google Cloud Machine Learning Engine. Once you've completed this tutorial, you'll be able get to predictions in real-time for events generated by a Pycom device that is attached to an appliance in your home or office.
For this tutorial, you'll be using:
EVRYTHNG:
- Provides device data and connectivity
- Data integrations, analytics and visualisations
- Run custom business logic
Google:
- Training and deploying the machine learning model
- Real-time predictions from device data
Pycom:
- An IoT device to monitor your appliance
Once your Google Cloud and EVRYTHNG accounts are setup, we'll go through the following steps:
- Install the EVRYTHNG
evrythng-pycomfirmware onto your Pycom device. - Clone the
appliance-classification-mlrepository. - Setup your local environment, including a new EVRYTHNG project which will contain the resources for this tutorial.
- Use your Pycom device to generate data and upload it from the device.
- Train the model locally and then run it in the cloud, using the previously downloaded data.
- Deploy the model to support online predictions.
- Deploy the integrator reactor script.
- Run your Pycom device to get predictions.
Before You Begin
You should be familiar with:
- Machine learning and Keras, which we will be using for this tutorial.
- Python, especially Python 3.6 (or higher).
- The EVRTYHNG API.
We will also use a Pycom device to generate events. If you have a Pycom device, you can clone the firmware that we used for this tutorial.
You also need a to setup a Google Cloud project and install the gcloud CLI. And in case you don't have an EVRYTHNG account yet, please create a free account at dashboard.evrythng.com/signup.
## Set Up an EVRYTHNG Project
We’ll be using the EVRYTHNG Platform to connect your Pycom device to the IoT. Our platform does not only provide a secure and intuitive RESTful API for your device, but also provides the integration between the EVRYTHNG Platform and Google Cloud via the Reactor. If you are not yet familiar with the EVRYTHNG Platform in a connected device context, the Connected Devices walkthrough will help you out.
Log in to the Dashboard and create a project, we’ll call it 'Machine Learning'. Inside this project, we’ll need the following resources:
Two action types:
_applianceDetected- to report classified property updates._prediction- which will contain the results from your model after new data is submitted.
Two applications:
- 'CloudML Integrator': This app will contain the reactor script that calls the prediction API of your model on Google Cloud and creates a
_predictionaction with the results. - 'Appliances App': The app to create the Thng for your Pycom device and run a reactor script every time we receive a new prediction.
A Thng:
To represent your Pycom device. Thngs that represent a device can have their own Device API Key. You’ll need to create the Thng first, then edit the Thng and select '+ Create API Key' button on the Thng’s details page.
Setup Your Pycom Appliance Monitoring Sensor
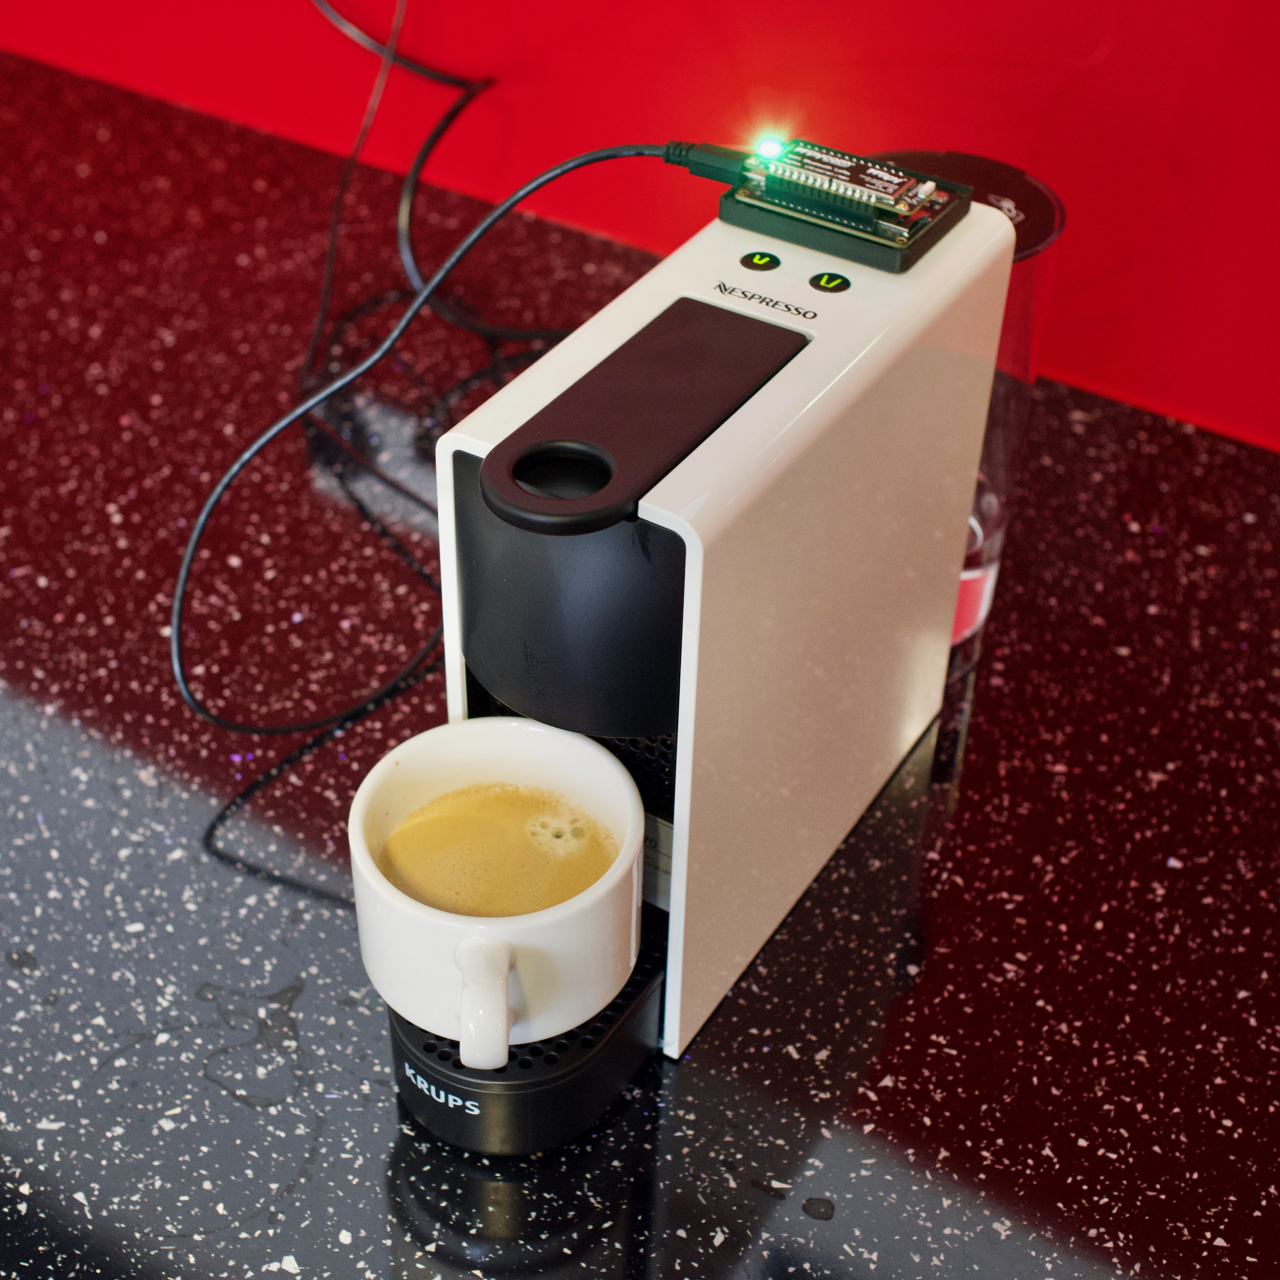
The pod coffee machine at the EVRYTHNG office
Now it’s time to connect your Pycom device to the IoT. Clone the EVRYTHNG Pycom firmware and follow the instructions. In the previous step, you created a new Thng. Add the Thng ID and it’s Device API Key to the config.json file as shown below:
{
  "thng_id": "<Pycom Thng ID>",
  "API_key": "<Device API Key>"
}
Setup and Configure Your Machine Learning Environment
Clone the appliance-classification-ml GitHub repository. This contains everything you need to train, build and deploy your machine learning model. We also provide scripts to automate most of the steps. The appliance-classification-ml repository is structured as follows:
evt- contains Python libraries to access data in your EVRYTHNG account.applianceml- contains the model and related files.
In the appliance-classification-ml directory, install a virtual environment to create an isolated Python 3 environment for this tutorial.
virtualenv -p python3 venvYou should source this environment for every new shell session:
source venv/bin/activateChange to the applianceml folder and run the following commands to install dependencies and custom evrythng Python libraries:
pip install -r requirements.txt
export ML_DEV_ENV=LOCAL
python setup.py build
python setup.py install
## Machine Learning
At this point, you’ve updated your Pycom with the EVRYTHNG firmware and your local machine-learning project is ready. It’s time to start with machine learning! We’ll be loosely following the universal workflow of machine learning that François Chollet described in his book Deep Learning With Python.
First, let’s talk about what we’re trying to achieve. Our goal is to train a model that can determine the type of appliance based on time series data from an accelerometer of a Pycom device which is attached to it. The problem we’re facing is a multiclass, single label classification.
We include a small sample in applianceml/data/evt_london_office.p, which we created by measuring vibrations of four appliances in our office:
- Grinding coffee machine
- Pod coffee machine
- Washing machine
### Collecting Your Own Data
Feel free to make your own measurements. If you do, you’ll need a way to label property updates with the type of appliances currently under observation. This is especially tricky if you only have one Pycom device, which is our case. We found that the easiest way is to download all the property updates after observing a specific appliance and then deleting its magnitude property in the dashboard (which contains accelerometer readings) before placing the Pycom device on a different appliance.
### Data Exploration, Feature Engineering and Model Training
Let’s have a look at the training data. Open the notebook in applianceml/notebooks:
jupyter-notebook 'EVT ML Connected Tutorial.ipynb'The notebook contains three parts. First, it visualizes the training data by plotting the rolling mean of the accelerometer data for each appliance.
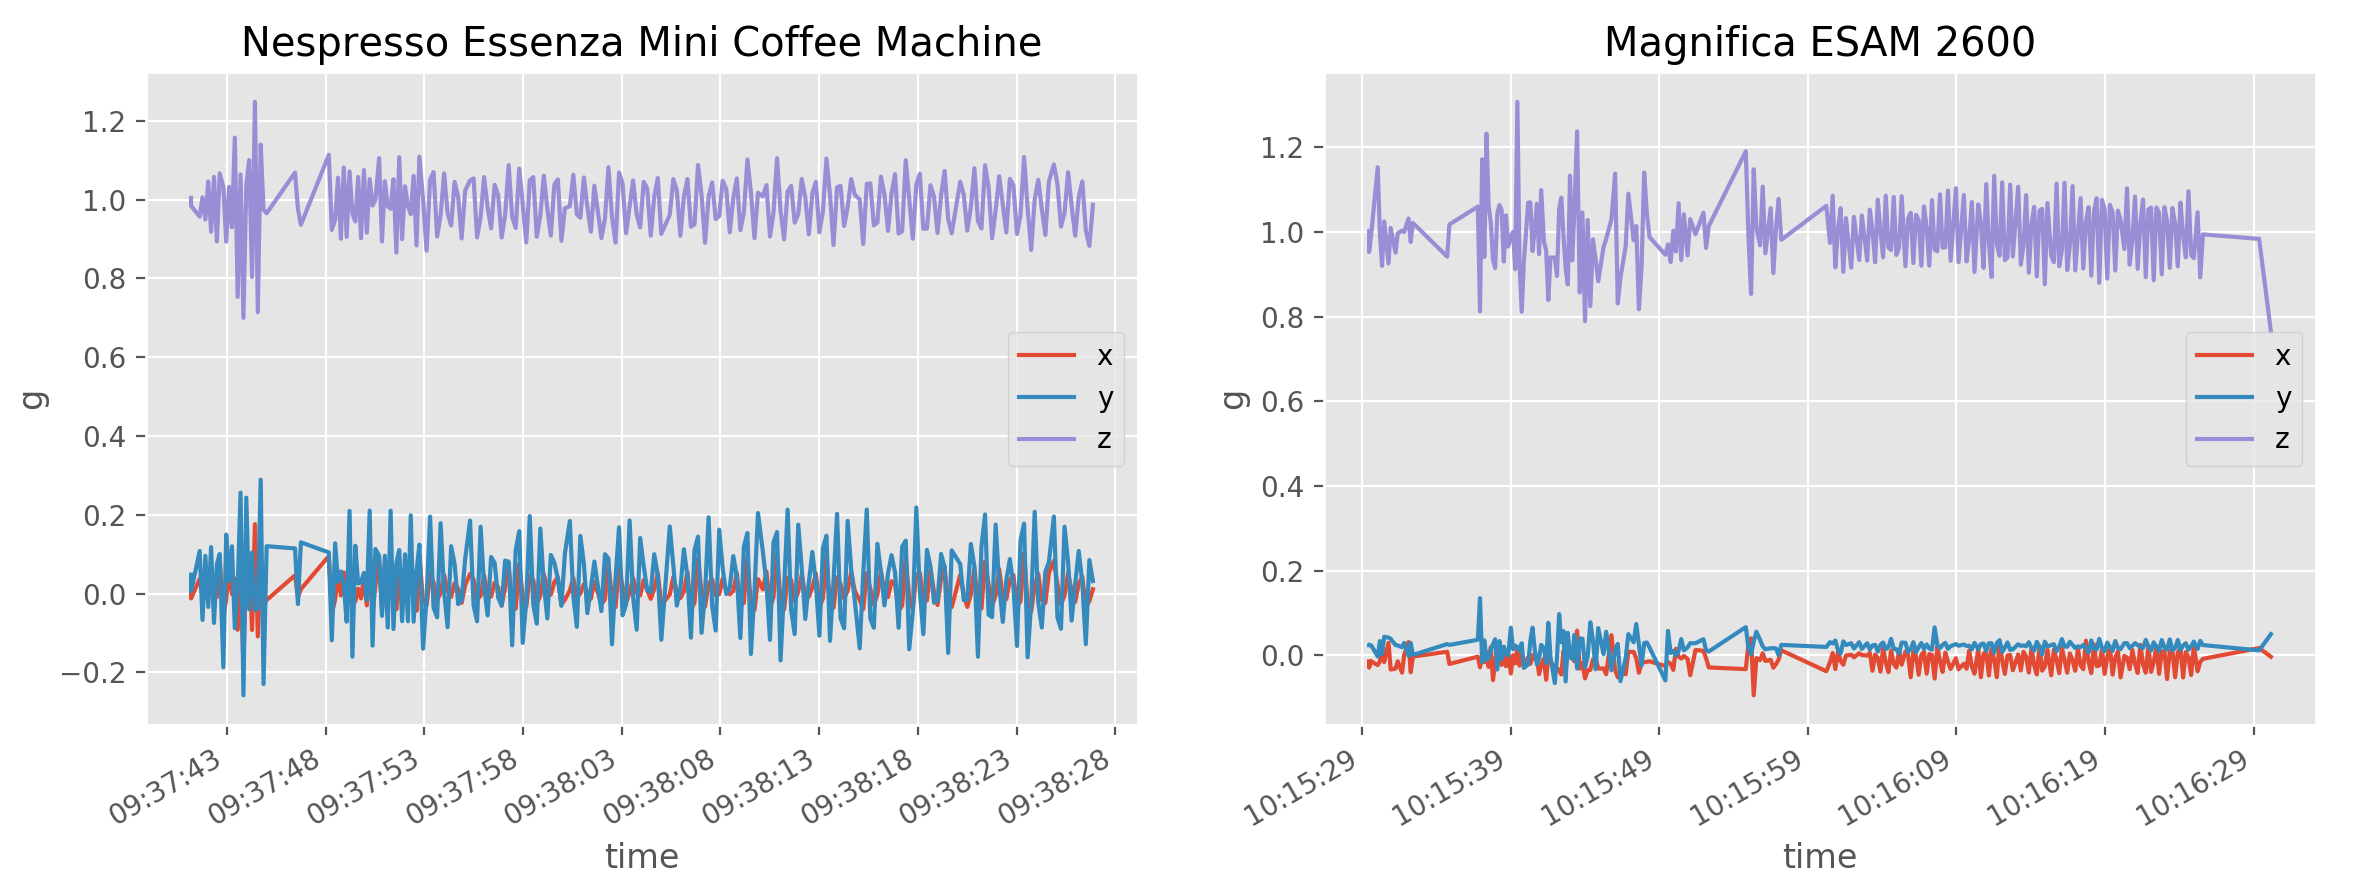
If we compare the washing machine and the coffee machine, we can see that a coffee machine and a washing machine vibrate differently.
We’ll be training a recurrent neural network. Unlike fully connected neural networks or convolutional neural networks, recurrent neural networks are stateful. This means the learning process includes past and present information.
Recurrent neural networks are computationally intensive. One approach is to first use a 1D convnet for preprocessing (convnets are more lightweight than RNN) and then stack a GRU (gated recurrent neural network) on top of the convnets. This is what our model looks like:
Layer (type)                 Output Shape              Param #
=================================================================
conv1d_1 (Conv1D)            (None, 148, 32)           320
_________________________________________________________________
max_pooling1d_1 (MaxPooling1 (None, 49, 32)            0
_________________________________________________________________
conv1d_2 (Conv1D)            (None, 47, 32)            3104
_________________________________________________________________
gru_1 (GRU)                  (None, 20)                3180
_________________________________________________________________
dense_1 (Dense)              (None, 3)                 63
=================================================================
Total params: 6,667
Trainable params: 6,667
Non-trainable params: 0
_________________________________________________________________
You’ll find the code for this model in trainer/model.py. We train the model with 20 epochs in the notebook, to see our network is able to extract patterns from the training data.
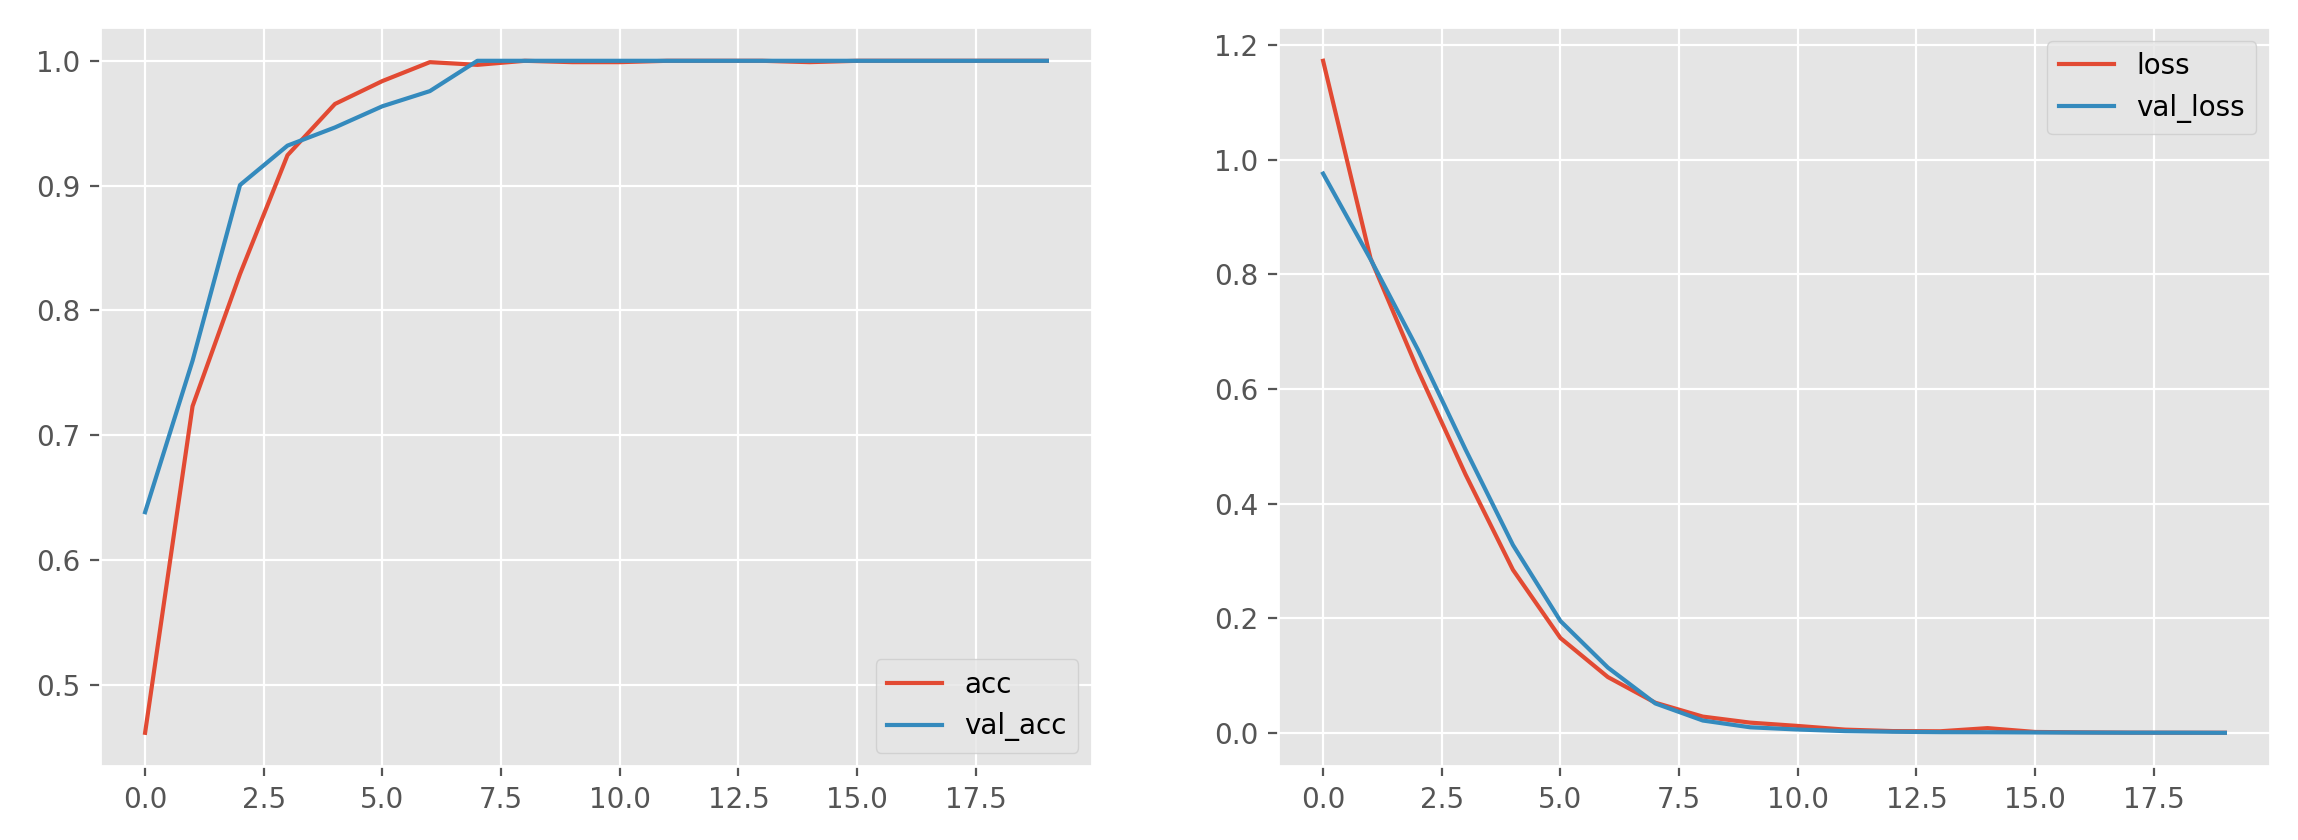
Accuracy and loss as training takes place over time.
The model was able to correctly classify all items. Let’s see if it still performs as well in the real world.
Using Google Cloud ML Engine
You’re all set to deploy to the Cloud ML Engine. If you want to know more about packaging models for the Cloud ML Engine, read Packaging a Training Application.
Before training the model in the cloud, we suggest you train the model locally first by mimicking the cloud-based process.
gcloud ml-engine local train \
  --job-dir output_keras \
  --package-path trainer \
  --module-name trainer.task \
  -- \
  --train-files data/train.json \
  --eval-files data.validate.json \
  --train-steps 10 \
  --num-epochs 20
For more details, please read Training Concepts. If your trainer works, you’ll should see something like this:
Epoch 1/20
10/10 [==============================] - 2s 238ms/step - loss: 0.3140 - acc: 1.0000
Epoch 2/20
10/10 [==============================] - 1s 135ms/step - loss: 0.0252 - acc: 1.0000
Epoch 3/20
10/10 [==============================] - 2s 155ms/step - loss: 0.0090 - acc: 1.0000
Epoch 4/20
10/10 [==============================] - 1s 130ms/step - loss: 0.0043 - acc: 1.0000
Epoch 5/20
10/10 [==============================] - 1s 137ms/step - loss: 0.0027 - acc: 1.0000

Epoch 00005: saving model to out_keras/checkpoint.05.hdf5
Epoch 6/20
10/10 [==============================] - 1s 136ms/step - loss: 9.9515e-04 - acc: 1.0000
Before we can use our model in the cloud to classify vibration property updates, we need to train the model and deploy it. You’ll find detailed instructions here.
First, we set the following environment variables:
export DATA_DIR=data
export BUCKET_NAME=connected-machine-learning
export OUTPUT_DIR=out_keras
export JOB_NAME=appliance_22
export JOB_DIR="gs://$BUCKET_NAME/$JOB_NAME"
export TRAIN_FILE=$DATA_DIR/train.json
export EVAL_FILE=$DATA_DIR/test.json
export GCS_TRAIN_FILE="gs://$BUCKET_NAME/$JOB_NAME/$TRAIN_FILE"
export GCS_EVAL_FILE="gs://$BUCKET_NAME/$JOB_NAME/$EVAL_FILE"
Next, we need to copy the training data to a Google Cloud Storage bucket, so that our model can be trained in the cloud. Make sure you create a bucket first.
gsutil cp $TRAIN_FILE $GCS_TRAIN_FILE
gsutil cp $EVAL_FILE $GCS_EVAL_FILE
Finally, and we can now train our model:
gcloud ml-engine jobs submit training $JOB_NAME \
  --stream-logs \
  --config config.yaml \
  --runtime-version 1.5 \
  --job-dir $JOB_DIR \
  --package-path trainer \
  --module-name trainer.task \
  --region us-central1 \
  -- \
  --train-files $GCS_TRAIN_FILE \
  --eval-files $GCS_EVAL_FILE \
  --train-steps 10 \
  --num-epochs 20
Training takes a while to start, so be patient. If your model was successfully trained, it’s time to deploy it to the cloud:
export MODEL_NAME=applianceml
export MODEL_VERSION=v1

gcloud ml-engine models create $MODEL_NAME --regions=us-central1
gsutil ls -r $JOB_DIR/export
gcloud ml-engine versions create $MODEL_VERSION \
  --model $MODEL_NAME \
  --origin $JOB_DIR/export \
  --runtime-version 1.5
Injecting Machine Learning into a Workflow
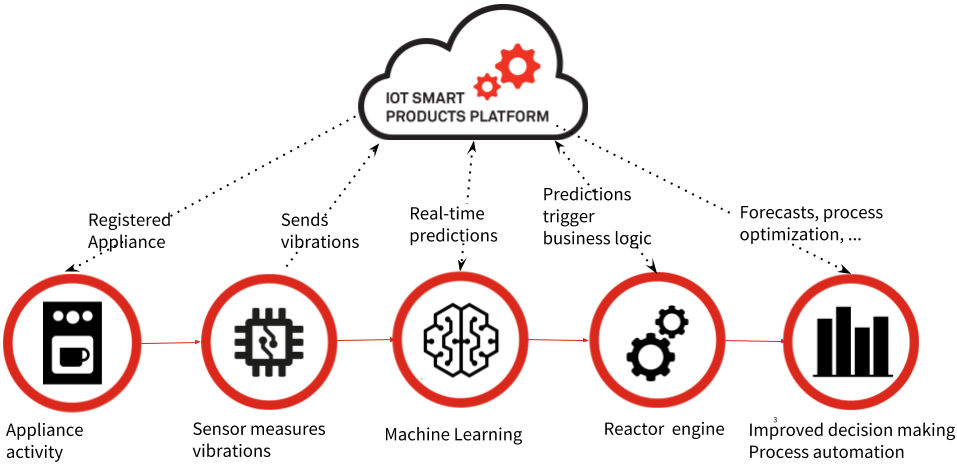
Your model should now be deployed and your Pycom device should be sending property updates every time the appliance it is placed on vibrates. Now it’s time to use your model to automate steps in a workflow that would be very difficult to achieve programmatically or would require specialised skills in other fields of artificial intelligence or statistics. Let’s take a step back for a minute and pause. Think about what we just achieved: We managed to let a piece of software program itself and learn to distinguish between different types of appliances simply based on vibration data. And all it took is a few lines of code.
All we need to do to finish the integration is to connect your EVRYTHNG project to your model in the Google Cloud ML Engine.
Deploying an Integrator Reactor Script
We’ll use the Reactor to relay property updates to the Cloud ML Engine and return predictions. This reactor script will also scale features and format the input tensor using the parameters elicited from training set. You might have noticed that the the last two cells in the Jupyter notebook exported parameters of the standard scalar object and the classes of the label encoder.
To deploy the integrator Reactor script, the bundle requires the aforementioned files, plus your Google application default credentials into a .zip file and deploy it to the Reactor. You don’t need to know how this works, the script deploy_integrator_reactor_script.py will do that for you. But if you’re interested in learning more about the Reactor, please the consult Reactor documentation.
Begin by setting the following environment variables:
export GOOGLE_CREDENTIALS=$HOME/.config/gcloud/application_default_credentials.json
export OPERATOR_API_KEY=YOUR OPERATOR KEY
export INTEGRATOR_TRUSTED_APP_API_KEY=TRUSTED APP KEY OF "CloudML Integrator"
export REACTOR_DIR=reactor
export EVT_HOST=api.evrythng.com
export GOOGLE_PROJECT=$(gcloud config get-value project)
export MODEL_NAME=applianceml
export MODEL_VERSION=v1
export MODEL_CONFIG_PARAMS=reactor/model_config_params.json
Then run the deploy script:
./scripts/deploy_integrator_reactor_script.pyIf the script executes successfully, you should see something like the following:
Adding preprocess.js
Adding labels_encoding.json
Adding main.js
Adding package.json
Adding input_data_params.json
{'createdAt': 1520867413829, 'updatedAt': 1523094958794, 'type': 'bundle'}
Every time this Reactor script executes successfully, it creates a _prediction action with the prediction from your model, looking similar to the one below (simplified for brevity):
{
  'id': 'UHqKdCxUeg8RQpRRwEc3DbPm',
  'createdAt': 1523266835605,
  'customFields': {
    'probability': 0.9947408437728882,
    'class': 'coffee'
  },
  'timestamp': 1523266835605,
  'thng': 'UnFNVHbBVgsRtpaRaDT7Ha2k'
}
We encapsulate predictions in actions because this allows us to write business logic as Reactor rules, without having to know how predictions were made. It also means we can change models and or machine learning providers without having to change other parts of a workflow.
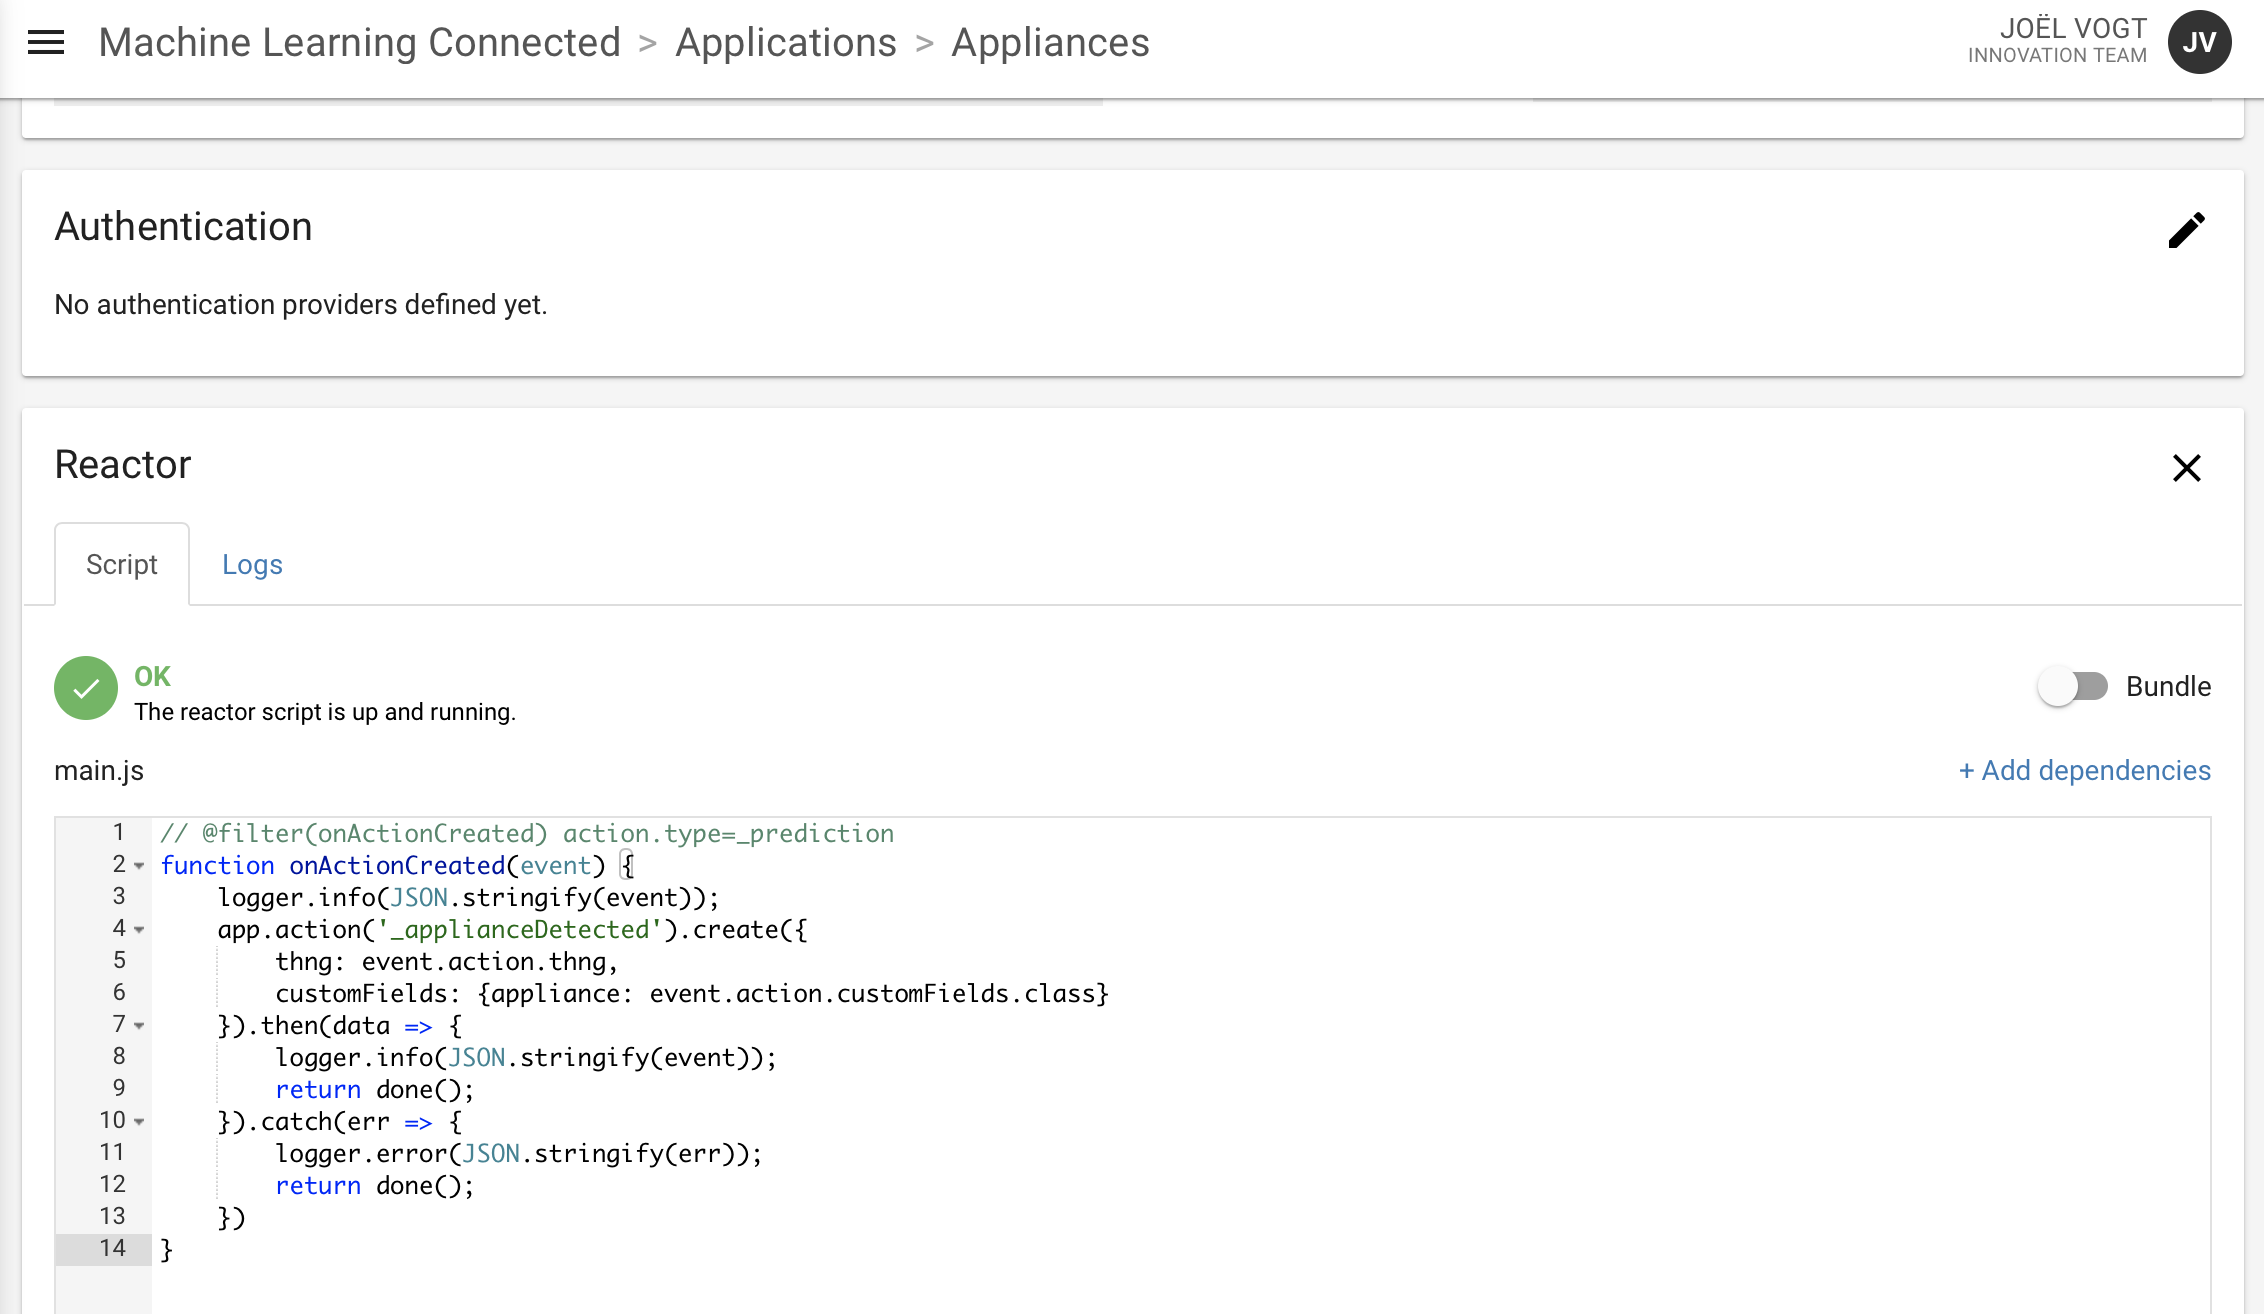
To give a simple example, the following script creates an _applianceDetected action, every time a _prediction action is created.
// @filter(onActionCreated) action.type=_prediction
function onActionCreated(event) {
  logger.info(JSON.stringify(event));

  const { thng, customFields } = event.action;
  const payload = {
    thng,
    customFields: { appliance: customFields.class },
  };
  app.action('_applianceDetected').create(payload)
    .then(res => logger.info(JSON.stringify(res))
    .catch(e => logger.error(e.message || e.errors[0]))
    .then(done);
}
To deploy it, open the Appliances application in the Dashboard, edit the Reactor dialog, copy and paste the script, and click update.
Now go to the Actions page and get your Pycom device to measure vibrations by turning the appliance on to a mode where the vibrations will occur as they would in normal operation. As soon as the device updates its motion property, you should see two actions, first the _prediction action from the 'CloudML Integrator' application and then a _applianceDetected action from the 'Appliances App' application.
You will need to reload the page to see the new actions, so wait a few seconds first.

Conclusion
You’re now able to use the EVRYTHNG Platform to build IoT solutions that contain a machine learning component. We used Google Cloud ML Engine for this tutorial, but nothing prevents you from choosing other machine learning offerings, from Microsoft or Amazon. All you’ll have to change on the EVRYTHNG side is the integrator reactor script.
Updated 9 months ago
